I cannot believe it is the last week of October already! Wow, Thanksgiving will be here in a blink and OMG Christmas is right behind it! If you are like me, you have so much to do and so little time, but I wouldn’t have it any other way. I love being busy with fun projects and decorating.
The card I am sharing with you today will be entered into four challenges. Yikes! That is a first for me!!! But first let me show you my card!!!

This card is entering these 4 challenges:
- TSG127 make a card or project with the theme of either Halloween or Autumn


I am so excited to be entering more challenges! I am still learning a lot about card making and all of you are helping me with your gorgeous creations! I love to sit and go through these challenges and see each and every card and see what you all are doing with papers, elements, inks, crochet, ribbons, LOL that list just keeps on going.
OK today’s card is a standard 5x7 card….white cardstock. Gorgeous paper from DCWV’s The Four Seasons is used as well as plain black and white cardstock.
The black panel is folded lengthwise and then run through my crimper on the diagonal. I ran it half way through then turned it around to do the other half. If you don’t do this, the paper is too long to crimp properly all the way down. The result is the pretty inverted V you see below.

The medallion is made with some stamps that I have had for a long time, and unfortunately I don’t know where they came from. But I just love this little cat and the Trick or Treat sentiment.

The TSTR challenge called for raffia or twine. Since I had neither, I used some black hemp under the bow.
The instructions for making this are below. I hope you like my card and will leave comments! Thank you so much for visiting my blog.


Paper:
- DCWV The Four Seasons
- White
- Black
Accessories:
- EK Success corner rounder
- Fiskar’s Crimper
- Wire edged ribbon
- 1/4” purple satin ribbon
- Cuttlebug embossing plate (spider web on base panel)
- pearls
- Glitter glue
Measurements (approximate):
- The card is standard 5x7size.
- Base panel DCWV 4 3/4 x 6 3/4”
- White for medallion: 2 1/4" x 2 1/4”
- Patterned DCWV brown: 1 1/4" x 5"
- Black panel: 2 x 5 3/4”
Instructions
- Cute all paper pieces
- Emboss the base panel
- Fold the black panel lengthwise and crimp. Run through the crimper on the diagonal. When it is about 1/2 way through, remove it, turn it and crimp the other half.
- Stamp cat and cut out.
- Adhere cat to small white cardstock. Use distress ink to distress the white but make sure a little white “shadow” shows around the cat.
- Adhere all layers and ribbon.
- Add pearls and place small dots of glitter on the eyes and nose of the cat.


![2012signature_joy_thumb_thumb_thumb_[1]](https://blogger.googleusercontent.com/img/b/R29vZ2xl/AVvXsEjoCwRnJOv9MD54y0M5DGw0Zdg_LB270T2QemJg3k1xkxlztnjIrShTUooTtapgacr50XXQS91p1b5G3v11dlr8jP-Yu6oBM6FQTx2xfystOHmsCHST_KHhSUJELlAmxn7320eqopsGTSQ/s1600-h/2012signature_joy_thumb_thumb_thumb_%25255B1%25255D%25255B2%25255D.jpg "2012signature_joy_thumb_thumb_thumb_[1]")
![anewdiv_joy_thumb_thumb_thumb_thumb_[1]](http://lh5.ggpht.com/-vw_Uz1VkxVw/UIW44KdLzTI/AAAAAAAAJYY/5s20VYrEpIo/s1600-h/anewdiv_joy_thumb_thumb_thumb_thumb_%25255B1%25255D%25255B2%25255D.png "anewdiv_joy_thumb_thumb_thumb_thumb_[1]")


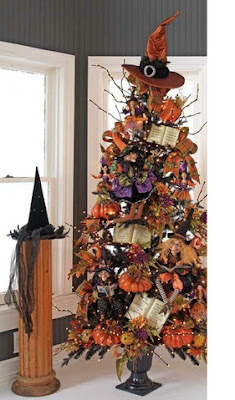 HALLOWEEN THEME in this photo AND USE PURPLE, ORANGE, BLACK & NEUTRALS WITH TWINE OR RAFFIA!


